Sourdough starter and sourdough bread is amazing to work with. It is very versatile, and the basic sourdough dough can be used to be crafted into sourdough cinnamon rolls, pizza crust, waffles, rolls, and more.

I haven’t bought bread for a really long time. In the last two years or so, I think I’ve bought one loaf. We are not anti-bread, but we have gotten along well without it. JSarr used to take dinner leftovers for lunch, and we eat things like fruit and yogurt, scrambled eggs, tuna lettuce wraps, quesadillas, and nacho salads for lunch.

Then a couple of months ago I started reading about sourdough, and how good it is for you to eat and is easier to digest. You can go to Kitchen Stewardship for more information. Then I read it is only three ingredients (4 if you count the start, but the start is made from two of the basic ingredients). I had to try! The sourdough start recipe is inspired by Living Water Health and Wellness (defunct website now). This sourdough bread recipe is adapted from Cheeseslave.

I have read many different instructions about starting sourdough. Some say to feed it every 8 hours or 12 hours. My recipe calls for feeding it every 24 hours. I try to find the most efficient way to do things, so I will be more inclined to repeat the process. The following has worked for me. Also, some say to throw away part of the start. I just don’t understand this, as it seems like a waste, and you could at least give it away. I have NEVER thrown any of it out.
- -whole wheat flour (I have read white flour is good to start with until you get the hang of it. I used a blend of white and whole wheat to start. I heard rye and spelt works, too.)
- -filtered water or water that has been boiled and cooled (if using tap water, you can let it sit out over night so the chlorine evaporates out of the water. I have made this several times, and I have used water right from the tap sometimes, and I haven’t had any problems)
- -glass or mason jar
- -cheesecloth or coffee filter (will crust and tear if you get the dough on it, so I recommend cheesecloth) to cover the glass jar
- -wooden spoon
Instructions
- Combine 1/4 cup of flour and 1/4 cup of water in the glass container and cover it with the cheesecloth.
- Leave it on your counter top for 24 hours.
- There will be a separation of liquid on top (called the hooch or alcohol) that is darker than the start, and you can pour it off if you want, but you can just mix it back in. I mix it in.
- Stir, and feed your start with another 1/4 cup of flour and 1/4 cup of water, and stir again. You can use a fresh container each day.
- Repeat this process for 7 days, and you have your sourdough start! When you see the bubbles, you have captured wild yeast. Isn’t that crazy? The start should have a sourdough smell.
- If you won’t use the start right away, you can put it in your refrigerator with a lid on it, and feed it equal parts water and flour once a week. It will keep in the fridge for a couple of months.
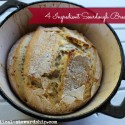
4 Ingredient Sourdough Bread
Ingredients
- 1/4 cup sourdough start which is the flour and water together: read above
- two cups of flour + more for the well-floured surface
- 1 1/2 cups of water
- 1 t salt update 10/30/12** I now use 2 t salt
Instructions
-
Combine 1/4 cup of your sourdough start with two cups of flour, 1 1/2 cups of water, and 1 teaspoon of salt.
-
Leave in a glass bowl on your counter (if it’s a cold winter’s night, you may want to leave it close to a heat source) for 16-17 hours covered with plastic wrap. I have used the dough after about 12 hours, and I really don’t notice a difference, but may be it’s less sour. It will look similar to a sponge, like the picture below, with all of those nice bubbles after the massive hours. It may feel really wet to the touch.
-
Place dough on a well-floured surface, and turn a few times. You don’t need to aggressively knead it. The dough can also stay a bit sticky in the middle, but the outside of the dough shouldn’t be sticky. I have had to add a cup of flour before at this point because the outside of the dough kept absorbing the flour. I sometimes use a spatula in one hand, and my free hand to mix it all in. This helps my hands to be cleaner. Make sure the bread looks like the bread dough pictured in the corningwear below or the bread dough pictured in the crock-pot below. It is relatively dry to the touch.
-
Put the dough in a colander (I like that colander has holes that allows the dough to breathe and can make a nice little pattern on your bread) or some kind of bowl lined with a cloth and cover completely.
-
Leave the covered dough for 1 hour and let rise (by a warm heat source is best).
-
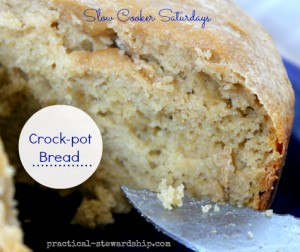
Put an empty Dutch oven or some kind of corningware with a lid in the oven (or cook it in the crock-pot) .
-
After an hour, turn on the oven to 500 degrees with the empty Dutch oven inside the oven so the Dutch oven gets nice and hot, and preheat for 30 minutes. This gives the dough a total of 1 hour and 30 minutes to rise.
-
Carefully take out the hot Dutch oven placing the dough inside (I actually plop the dough in because it’s so hot), and put the lid over the dough. Often times my dough sizzles when it hits the Dutch oven.
-
Put your Dutch oven back in the oven, and bake the bread at 450 degrees for 25-30 minutes (I sometimes bake it at 400).
-
Take off the lid, and bake for another 10-15 minutes to brown the bread if needed.
-
Cool, slice, and enjoy!
Below the recipes are pictures of what the dough and bread should look like in different stages.
The start separating here below: totally normal
")

Pictured above is what the bubbles should look like after the dough has been on your counter all night. The dough is spongy and wet. The more whole wheat flour you use, the less wet and spongy it will be. Here is one more picture of the wet sponge overnight.
 Below, the first picture is a picture of the dough right before turning onto the flour. The middle picture is taken after the dough has been turned onto a floured surface until the dough is “dry” to the touch.
 **Update 10/10/12 I made one batch of sourdough bread out of wheat flour the other day and divided it into two equal parts right before the 1 1/2 hour rise. They rose in their own greased loaf pans, and it made 2 short loaves. I preheated the oven to 500 degrees with nothing inside and forgot to turn it down. So I baked the two loaves together uncovered at 500 degrees for 18 or 20 minutes. Despite the mistake, they were beautiful and tasty as seen below.
 Then today I made 1 loaf out of 1 batch of sourdough bread so the bread would be taller. It turned out great, too. I baked it uncovered for 30 minutes at 450 degrees. I was talking to my friend Merri about what I did, baking the bread so hot the previous day, and she commented that sourdough is forgiving. She is right!!!**

 The Verdict: The first time I made this, JSarr said, “this is the most impressive thing you’ve ever made.” It seems like something you would buy in the store and it’s SOOOO easy. Its just takes some pre-thought. We love this and eat this ALL of the TIME!!
Update 1/7/13** I did the cost breakdown and figured it costs about $0.61/loaf to make for the ingredients. You can go here to see the actual cost breakdown.
Want another idea to make with your sourdough start?

How about Sourdough Doughnuts?

Try making sourdough pizza crust, calzones, or breadsticks with the same recipe.

Or want to try making the sourdough bread in the crock-pot? Go here to see how…


I made this starter up. After a week, I went to bread recipe. The bread raised very nice and the taste was great. I am keeping starter and making more bread tomorrow. Yummy!
All went well until step #4 under the 4 ingredient sourdough bread. It did not rise in the colander. I kneaded it as gently as I could, but it was kind of runny and sticky, but the additional flour stiffened it up for sitting in the colander. So what did I do wrong?
What kind of flour did you use?
My sourdough isn’t sour! My starter seemed just about perfect (very bubbly, floated in water). I did have to add lots of extra flour to my dough. Probably about 2 additional cups of flour when I add it all up. Would this have caused the lack of sourness?
Hi Martha. Yes, adding that amount of flour is totally normal. Did the start smell sour before you added it? Glad to hear the start looked great.
The bread didn’t work at all for me. It just seems to be way to watery.
Hi Sue, It sounds like you need to add more flour. Don’t give up! Thank you for sharing.
Hi Sonja, Thanks so much for your robust directions with images. This has been a wonderful adventure so far. The starter I created by following your instructions is fantastic! However, I’ve tried your bread recipe below three times now, and every time I’m ending up with REALLY wet dough. Last time, I added more flour, but that led to a dense and rather unpleasant loaf of bread – I imagine the flour I added did not have time to ferment and develop a good gluten structure. This time I’m trying to let it sit out longer (going on 17 hours now), but it’s still very wet. Any suggestions? Perhaps I should increase the flour at the top, before sitting overnight?
Thanks for any advice you might have. I really want to get it right! 🙂
Hi Jess. What kind of flour are you using? Are you using any white flour at all? White flour will lighten the heaviness of the dough. Try half white flour. I hope this helps!
Hello, thank you for this great instructions. I just started my sourdough starter last night around 9pm, 12 hrs went by and the hooch was formed already (dark liquid separation) should I feed my starter now? Also, if I’m to feed equal parts each day, wouldn’t there be a lot of starter at the end? What to do? Thanks in advance
Yes, you can feed it right away. Sourdough is very flexible. Yes there will be start left over. Some people say just throw it away. Or you could give it away. I tend to either give it away or put it in another jar and have two starts going, and just use it right away. Hope this helps!
Hi there! I’m on Day 4 now, the mixture is separating, but in the middle. and I’m not sure if this is normal…..? Any clarification will be appreciated! Thx!
Hi Maria. Separation is completely normal. Just mix it up and feed it again.
Hi! Do you have any instructions for baking this in a bread maker? I’ve tried it a couple of times but the dough is always SO liquid that by the time I am able to pick it up, it’s too dense with flour when it bakes and turns out like a rock. I thought about letting it rise and cook in the bread maker but I’m not sure what settings to use.
Hi Aimee. I’m sorry to hear about your dense bread. I’ve never used a bread maker, so I am sorry I can’t help you with that…
Thank you so much for sharing this recipe! I have been looking everywhere for a simple sourdough that only uses these few ingredients- found it here and will be making a loaf from my starter this weekend.
Amelia, Thanks for sharing. I hope you enjoy the recipe. I’m always trying to find more easy and efficient recipes!!
Do you grease the Dutch oven at all prior dumping the bread in Or should I leave it dry
Hi Doug,
I don’t grease the Dutch oven because it smokes. When the bread goes in, it will sizzle a little because it’s been heating so long and high. I hope this helps!
Thank you for the easy to follow instructions. I began my sourdough starter 7 day ago. I saw a few bubbles at the time for the first feeding so I was encouraged. Before feeding it the last few days, there were bubbles on top of the hooch but I don’t see any below in the white mixture (I used white flour). Because I won’t be able to do the steps for making the bread at the right time tomorrow, I fed the starter again tonight. I am wondering if the the starter is active enough to successfully make my bread rise, as I hope to mix it into bread tomorrow. I was also wondering if it is necessary to use white flour to make the bread if I used it to make the starter. I do enjoy using wheat flour for some recipes but used white flour for my starter “experiment”. Thank you.
I would start out with white flour for the entire bread the first few times. As you get used to it, you can go half wheat, half white. I do 100% usually knowing that it won’t be as bubbly. I would use the start as is. Hope this helps!
Thank you for replying. After reading more of the comments and messaging you, I started keeping the mix in the oven with the light on and pouring off the hooch when possible. I will start using the half cup of flour this morning and continue with the original start, hoping it will soon be ready. One thing I can say about myself is that I am not a quitter. lol
So glad you have perseverance Cheryl! Hope you got it going now!
I started this process six days ago with unbleached white flour and filtered water and used a clean jar everyday. The starter has not increased in size and is very watery. It is bubbly on top but has more of a flour smell than a sour smell. On another website I read that the way to tell the starter is “ready” is to see if a small glob of it will float in a bowl of water. I’m afraid mine will never be doing that.
Hi Cheryl. I am sorry to hear your start isn’t going well. I’ve always used a whole wheat flour start. The white flour requires that you use more, maybe even 1/2 cup flour to 1/4 cup filtered water. It should be the consistency of pancake batter. Also, are you placing your start near a warmer area? It will bubble better near a warmer area like near a stove. I’ll put mine by a crock-pot that is on. Don’t give up. Keep trying. You can do it! Thanks for sharing, and I wish you the best!!
Completely heartbroken that my loaf didn’t turn out. 🙁 I’m guessing it was too chilly in my house last night (67) and perhaps I didn’t add enough flour when mixing with the starter. I read (after the fact) that when using regular flour, you need to use 3 cups instead of 2. SOOOOOOOO, I suppose I’ll be attempting another loaf maybe tonight prior to going to bed in hopes that my second attempt will be successful! PS, even bread that doesn’t turn out smells FANTASTIC while baking. It’s killing me knowing I won’t be able to eat it.
Hi Courtney. Glad it smelled good. DOn’t give up. Use the 3 cups of white flour to start. 67 degrees is a little cool. I like to put my bowl by a warmer place like a crock-pot when it’s on or heat source. You can turn your oven light on and put your dough in the oven overnight. I hope this helps! God bless your future endeavors!
I recently started this sourdough starter, and today is the fifth day since it was born from flour and water. I have a bit of a problem… After I moved the starter to a medium sized glass bowl (we don’t have any larger tall jars that would fit the starter as it got bigger), I’ve noticed that the amount of solid that sinks below the dark liquid has become bigger and bigger, while the number of yeast bubbles decreased. This is my first time making bread, so I stuck with all white flour at your suggestion. I had been sticking to the plan of feeding the baby every 24 hours, but I was a little late on tonight’s feeding, and noticed there were no bubbles. It looked very much like the solid at the bottom had risen to the top. I may be overreacting, but just in case, is there a way to salvage this project? I’d hate to let it all go to waste. 🙁
Hi Katie. I don’t think it’s too late to be salvaged. Put the start by a warm heat source like a crock-pot that is on, by a fireplace, or warm vent. Hope that helps.
I would like to do Gluten Free Sourdough Bread. Will your starter work with Rice flour or what flours would you reccomend that are Gluten Free. Thanks Melody
Hi Melody. I know others do a gf sourdough, and I am sure with an Internet search you can find a recipe. I haven’t personally tried one. Here is one I would trust: http://glutenfreesourdough.blogspot.com/p/boosted-brown-rice-starter-gluten-free.html Hope that helps, and thanks for visiting.
I can’t count the number of times I have tried to make homemade bread with regular yeast and wild yeast and I have failed every. single. time!!! So frustrating. I was so excited about this one. It even had bubbles this morning after sitting for the 16 hours but ended with the exact same result as all the others. It never rose even a little bit and I ended up with a nice round (good smelling) brick. 🙁 My wild yeast starters look great for about three days and then aren’t so bubbly and I have a lot of hooch. I’ve read this is because the starter needs to be fed more so I try to increase the feeding. I keep it on the counter close to the stove, toaster oven, crock pot, etc. And, I put it in the oven with the light on for the 16 hour stint. I honestly have no idea what to change but I’m determined to keep trying. So far this is the only thing I can’t make. With a family of six, I really need to master this!!! Or at least feel like I’m getting close for once! Suggestions or just keep trying??
Hi Stacey. I love your perseverance. What kind of flour are you using?
I have been making the starter. This is the 5th day, but it has been very bubbly since the third day, and smells very yeasty. It seems pretty runny, is that how it is supposed to be? And I do not think it is doubling in size like some websites claim it should do. I have carefully measured 1/4 cup all purpose flour and 1/4 cup water daily and mixing well. and I did not know to not use a metal spoon to stir, but it has not killed it so far, and now I have switched to a wooden spoon. Do I need to wait the entire 7 days before trying to make bread if it is so bubbly/yeasty smelling? I am keeping the starter in a glass jar, my house is sometimes pretty cool, especially at night, (I am in Reno) so I wrapped a towel around it to help keep it warm. I am really excited to try to make bread with it.
Hi Patrice. If it seems sour enough, I would definitely go for it! Sounds good about the towel in your cool house. Yes, the starter can be runny. Sometime if it’s runny, I’ll add a little more flour to the starter. The starter and sourdough in general can be flexible. Hope you enjoy!
Yay sourdough! I need to make a new starter. Hello from the Fat Tuesday linky.
Hi Melissa, I love that the sourdough start is so easy to make. Only 2 ingredients!
Thanks… I have started Trim Healthy Mama and it says that the sourdough has to ferment for three days before I can make it/eat it.
Hi Kaylene. That’s good to know about the sourdough. I might purposely let it go longer now.:)
Have you ever tried leaving the dough out for more than 16 hours maybe like three days and then cook it do you think that will be okay??
Hi Kaylene, I’ve definitely left it out longer than 16 hours. Sometimes 24 hours. If it’s beyond that, I put it in the fridge. I have left a loaf ready to bake in the fridge a week. I hope that helps!
Hi Kaylene, I’ve definitely left it out longer than 16 hours. Sometimes 24 hours. If it’s beyond that, I put it in the fridge. I have left a raw loaf ready to bake in the fridge a week. I hope that helps!
Thanks for the response…I tried it again, this time keeping it in the oven with light on. I ended up letting it sit for closer to 18 hours and there were definitely bubbles. I have it in colander now in the oven with the light on and it is still not rising…? Could my start be bad? Also, when I turn the dough out (after the 16+ hours) it has been VERY runny. It takes me a good amount of time and flour to even get it workable. Could I be overworking?
Hi Nicole. You said your start smells sour, right? It’s probably fine. Good that the dough was runny. When you use all white flour it uses A LOT more flour than whole wheat, so just keep adding flour until it’s not sticky to the touch anymore. How long was the dough in the colander with the light on? Hope this helps. How was the taste?
Yes, start smells sour. I have been using a blend of white with whole wheat. I left the dough in the colander for over 2 hours hoping it would rise…it never did, so I used it to make bread sticks instead. The dough tasted ok, but was very heavy/dense. Any other suggestions?
I followed the recipe/instructions for the start, using only white flour ( I wanted to increase my chances of it turning out well!); however, I just put it in the oven despite the dough not rising at all. We live in MI, so it is colder, but my house is kept around 69 most of the time. I allowed the dough to sit in the colander in the oven, which I had warmed a little. Any ideas? The start smelled sour and there were bubbles…just no rise whatsoever. I really love sourdough and would LOVE for this to work, so any suggestions would be appreciated. Thanks!
HI Nicole, We keep our house at 67 degrees all the time (we live in Washington State), so keeping our dough out overnight means it will be cold if it’s not near a good heat source. If the crock-pot is on overnight for broth, steel cut oats, or something, I’ll put the dough right next to it. I think it’s important to have the dough in a warm spot for the whole rising time, not just the last 1 1/2 hours. I hope this helps. Let me know if you have any more questions!
Made the bread & it was delicious! It was a pretty flat bread but still good. What is the best way to store the loaf after cutting it? Thank you!
Hi Lisa. Glad you liked the taste! Now to get a better rise, the key is to let it rise in a warm place. I started letting it rise inside my oven overnight with just the light on only. The light provides enough heat to warm it up. If it’s during the day, and my crock-pot is on, then I put the bowl on top of the crock-pot VERY carefully as the heat source. The bread will be lighter if you get a good rise. Thanks for sharing!
When putting it in the fridge, you wrote to put a lid on. Do I need to put the lid on loosely so the starter still gets air? Thank you for your delicious looking recipes.
Hi Marie. I put a regular lid on the jar of starter and close it tight. If I think the start need more air (like it doesn’t smell a good sour smell), I put it on the counter exposed to the air. I feed the start every time I use it which is about once a week. Really I don’t leave my start on my counter anymore. My start has been going since 3/12. Thanks for asking and for visiting!
Thanks for the motivation to start making my own sourdough! A few questions… I typically don’t have any kind of white flour in the house, I do happen to have some whole wheat though. I wasn’t sure if I should do the start with all whole wheat or if it would be best to do at least 1/2 whole wheat and 1/2 white? Well, I did end up borrowing a little white flour from my neighbor and so far have done 1/2 and 1/2. I’m on the third day of feeding it and it already seems to be starting to bubble. But it has kind of a bad smell, not quite sour, but rancid (no mold in sight though)! Come to find out my neighbor gave me ‘bread flour’, I honestly don’t know what the difference would be…. So do you think it would make a difference? Do you think my start is bad, having that smell? Also it’s become a big massive gooey glob, is that normal, or should it stay a liquid? Sorry for being long winded… Thanks a ton for any help you can lend! Blessings to you.
Hi Katia! Now my start is 100% whole wheat (it’s a hard white wheat so they call it white whole wheat). When you start baking the bread is when you MAY want the half white and and half whole wheat to start. Now I make it with 100% whole wheat flour. I always stir the start really well so the start is smooth. If you need more filtered water, add it. The start should be a little thick, but smooth. I don’t know about the bread flour. And I am not sure about the smell-I am sorry. I wish I could help you more! I wish I could see and smell it. Blessings on your sourdough endeavor!!
Sonja! Thanks so much for all this wonderful info! Can you freeze your starter if you’re going to be away longer than a week?
Hi Tina, That is one thing that I actually haven’t done, but I think it’s worthy a shot. For what it’s worth, I have accidentally not fed a start for two weeks in the fridge without killing it. If you want, you could split your start, feed them both, and freeze one and keep one in the fridge. I always have two starts in the fridge (just in case). In fact now we have three starts in the fridge because my 6 year old wanted to start one. Blessings, and thanks for visiting!
Your bread looks WONDERFUL!!! I’ve tried making a starter once but for some reason it just didn’t work once I went to use it, I’ll have to give it another go sometime! Your bread looks amazing!
Hi Maria. Thanks so much. We have had good success with the start. Just equal parts of flour and water. Give it a go again!
This is such a great blog!!! Really makes me hungry just reading and looking at the pictures : ) I recently baked my first loaf of bread and it was incredible!!! I used a starter my friend told me about. It’s from Sourdough’s International and now I have to spread the word! I loved it. Definitely going to order more when it comes the time.
Hi Rachael. Thank you for your kind words! Isn’t real sourdough amazing? Thanks for sharing and visiting!
Thanks for the recipe – my husband makes all our bread using artisan recipes with just a few ingredients – and it is lovely. I will pass this onto him!!
You are welcome. We enjoy this recipe at least once a week! Thanks for visiting!
I went ahead and skimmed off the layer of liquid from the top of the raised bread dough– I ended up mixing in lots of flour to get it to a non-sticky consistency. I then let it sit for the second rise. Even after 2 hrs. it didnt’ to have risen at all– I went ahead and baked it, and like I anticipated, it turned out very dense. How do I remedy this?
Oh- this might make a slight difference– I decided to make a double batch and used a plastic bowl for the 17hr rising period because I didn’t have a big enough glass one…will that make a big difference with this bread?
Thank you for getting back to my earlier comment, I really appreciate it!
I definitely wouldn’t double the batch. I am wondering if the weight of the extra dough affected your rising.
I am very excited about this recipe, but I am having some problems with it.
My starter did have the sour smell, but I hardly saw any bubbles. It was very liquidy. Also, it seperated considerably, there was a deep layer of that clear yellow-y liquid on top- by the end of the 7 days it was probably about a quarter to an inch deep. Is that normal? Today was baking day– I set the bread rising last night, it sat out for 17 hrs. I’m afraid to do anything with it because it is very wet looking, hardly any bubbles, and there is that same layer of clear, yellow-y liquid on top.
I used our reverse osmosis water for the starter and straight unbleached white flour. Warmth isn’t an issue, I live in Texas and it has been in the upper 90’s and 100’s this whole week. I admit that there were two days (though not in a row) that I was away and couldn’t feed the starter- I made up for them though and fed it for a total of 7 days over the course of 9. Will that ruin the starter? Also, we live in a very dry climate, will that effect the harvesting of wild yeast? I’m going to go ahead and skim off that top layer from the bread and try cooking it anyway, just to see. I really want to get this to work for me, I just need to know what to change. Thank you for any advice you can give!
Hi Desarae, Thanks for sharing your excitement! The start should be liquid-y. You won’t always have a ton of bubbles. All of what you are experiencing sounds normal. The separation of the liquid is supposed to happen. You just mix the liquid yellow all back in (in fact sometimes the liquid turns even darker. The smell is the most important part, and it sounds like the smell of your start is good. If you skip a day feeding your start, it’s not the end of the world, as long as there is no mold growing. The only time I killed my start was when I left mine out 3 days in the summer and didn’t feed it. Oops. It was obvious it had gone bad. 17 hours is the perfect amount to leave the bread out. It sounds like now you have to add more flour before the second rise. Let me know if you have any more questions. Hopefully this helps.
Mine didnt turn out so good! I made it twice to make sure that I hadnt messed up the first time.Both times it was had as a rock and packy inside.It was as if it hadnt risen at all! For all that waiting,it was very disappointing..
Hi Cecilia, What kind of flour did you use? Did you use a mix of whole wheat and white flours? If you are first starting this, and aren’t getting good results, I would start with a blend of 1/2 whole wheat flour and 1/2 unbleached white flour. Now I do use 100% whole wheat, but I do live with a slightly denser bread than I did when I was making it half and half. How warm was the room in which the dough sat?? Did your start smell sour? Did you use a metal spatula? There are a few variables. I hope you don’t give up. Thanks for sharing, Cecilia.
Im just got a starter from a friend and fed it for today. I put it into another jar because I didnt think there was enough room in the first jar. Will that kill the starter?
Hi Marlene, Moving jars won’t kill the start if it’s a glass jar. Thanks for visiting!
Just wanted to comment on using tap water for the start. Because I am a bit lazy (and overwhelmed as a new mom) I used water straight out of the tap. It failed miserably. I wanted to make sure it wasn’t ineptitude on my part, so I tried a new start with tap water I’ve boiled. After only two days, I can tell it made a huge difference. I already have the sour smell that I didn’t ever have even after a week using straight tap water. Looking forward to getting to the bread making part!
I am consistently using my filtered water now, but I used to use tap water occasionally. Maybe our tap water has less chlorine than yours?? I am so glad that your start is working.
I have always wanted to have a sourdough start but have felt intimidated and nervous about it because I didn’t understand it and how to use it. Thank you for the great tutorial and recipes. I’m eager to start trying it now.
Hi Lori, I hope you have great success. It really is so easy! Just equal parts flour and water added to daily. Thanks for visiting!
I am all kinds of glad I saw your starter recipe first – when I went searching for others just to see, they scared me. 🙂 I got my bubbles around the 5th day or so, using a combo of wheat and white flour, whichever I happened to grab out of the pantry that day. I’ve made muffins so far, and the dough rose beautifully!! So that (and the bubbles) tells me I’ve got yeast in there, but my starter hasn’t once grown on its own. Is this normal/ok? I’ve kept it on the counter and fed it every day. I’m excited to try bread!
Hi Leigh. I am so glad you have had success with muffins.
Would you mind clarifying about your start not growing? Does it have bubbles? Does it have a sour smell? That is what is most important. Typically I leave my starts (I keep two starts at a time) in the fridge so I don’t see a lot of growth on them. If I move them on the counter overnight occasionally I will often see a little froth of bubbles on top.
Hope this helps, and thanks for visiting!
Do you use yeast at any point in this recipe or does the flour/water starter make it’s own yeast?
Hi Bobby, It’s like a science experiment the first time you make a sourdough start. No, you don’t need any commercial yeast at all in the bread recipe because the flour/water starter has captures wild yeast from the air. It’s crazy and amazing!! Try it! Thanks for visiting!
I didn’t use my start right away and put it in the fridge. It’s been in there about a week, but I didn’t feed it. Do you think it will still work?
I am so blessed by your blog, and inspired in many ways!
Hi Andrea, Your start should be totally fine! I use my starts (I have 2 of them) about once a week each, and feed them at that time, so mine only get fed once a week. As long as it’s not molding, it should be fine.
It should smell sour. If it doesn’t, leave it outside your fridge on the counter, and feed it 1/4 cup flour, and 1/4 cup water every 24 hours. Then keep it in the fridge. I really don’t leave mine on the counter too often anymore since it’s gotten started.
Thank you for the encouragement, and have a blessed holiday season!
It didn’t turn out so great. But I wonder if adding 3 cups to the starter then adding whatever you knead in with it would do better. My bread didn’t rise so much, really probably not at all. But I still went ahead with it. I did leave it a little longer then an hr since I got busy thinking extra rise time wouldn’t be bad. It got very hard on the outside (450 with about 23 min bake time, then the 13 min after taking the lid off), but soft on the inside, but it looked NOTHING like the bread in the pictures. It was very dark looking. The inside is probably almost good, but not quite. I’d love to just use this as our main bread and not have to buy any bread ever again so I’m not ready to give up. I tried 3 different loaves today. One in the crock that did not turn out at all, one in a glass pan in the oven, that one didn’t do well and one in my cast iron dutch oven which is the one that got more crispy on the outside and was the best out of the 3.
Hi Christina. Thanks for the update! Sourdough is hard on the outside, typically. Was it like a rock on the outside?
I am surprised that it’s dark inside, especially if you used white flour.
I HIGHLY recommend not trying this in the crock-pot until you like how your bread is turning out in the oven, so you prevent wasted time, and energy. When you like your bread out of the oven, then try the crock-pot.
It was really hard to cut through. It probably was just about there in my cast iron dutch oven. I just need to figure out why its so runny to begin with. I think the amount of flour that was added to it may have prevented it from being perfect. Made it heavier. It definitely wasn’t rounded or light in color. For some reason homemade bread and I do not get along.
I just want to encourage you to stick with it, Christina! Have a great week!
I left my dough out for the 16/17 hrs and went to get it ready today to rise and I literally had to pour it onto the counter. I did the starter using half and half but then made the dough with just white. I’m still going along with it to see what happens. I put it in the oven with the light on since our kitchen can get chilly with cold weather. I did add up to a cup of flour plus whatever was on the counter and it did firm up a bit during the kneading. It did have bubbles on it before kneading.
Hi Christina, Good new! This August I was at a friend’s who only uses white flour. I brought my whole wheat start, and made them some bread. When I made the dough I used 2 cups white flour, 1 1/2 cup water, 1/4 cup start, and 1 t salt. It was VERY wet the next day after waiting. When I added flour for the last 1 1/2 hours of rising, I couldn’t believe how much of the flour the liquid from the dough absorbed. I used WAY more flour than I have ever used before, probably at least an extra cup like you. Long story short, I just saw my friend 2 days ago. I left her some start back in August, and she makes the bread about once a week. She said she uses 3 cups white flour, 1 1/2 cup water, 1/4 cup start, and 1 t salt when she first makes the bread. So it sounds like you are on the right track! I would love to know how it turns out! Bubbles is a great sign!
I’m getting ready to start this and want to make sure I do it as right as possible. Is the starter just to make one loaf or thats to make multiple loaves out of just that one recipe? Also I would make the bread on the 8th day right, so it goes a full 7 days? Also for the full 7 days I need to keep this somewhere warm at all times? Thank you for posting these recipes. I can’t wait to have a constant flow of sourdough bread instead of having to buy bread anymore.
Hi Christina, The starter is for you to have forever. That you keep feeding. Every time I make something sourdough, I feed my start with at least a 1/4 cup water and a 1/4 cup whole wheat white flour. I have had my start since March. I subdivided it so I actually have 2 starts in case one dies. I only killed one start once and was glad I had my backup. Once I went through the 7 day process I don’t leave my start on the counter very often. May be over night, and then I put it in the fridge and feed it once a week. I usually feed it when I make something else sourdough.
The bread recipe (the second half of the post) makes one loaf. Make the bread the 8th day. Instead of feeding it once a day, you could feed it every 12 hours and probably have the start ready in 3-4 days. It’s got to smell sour and have bubble. And bake it about the 4th day, but only if you are truly impatient.
Yes, the start should be warm, like on your counter. I leave mine on the stove or next to my crock pot.
Hope this helps, and let me know if you have any other questions!!
My dough did not get spongy either. I used Whole Wheat and my house is not cold. Should I start over or let it continue to sit?
Thanks!
Hi Amy, Does your start smell sour? Did the dough have any bubbles at all? How long after the initial mixing of the ingredients are you talking?
🙁 mine didn’t bubble and get spongy. It’s still liquidity. But the house is cold…. around 65 – 69 degrees…. could that matter?
Hi Missy! Yes, the start/dough should be in a warmer area. You can try putting it in your oven with the oven light on only with the oven off. That should provide enough heat. Also, is your water filtered (you can leave a cup of water out on your counter for 24 hours to let the chlorine evaporate from it)? What kind of flour are you using? Now the dough will be wet.
If I wanted to use loaf pans, would this work?
Hi Joyce, I have not made it in a loaf pan, but I had a friend who did it with success. You’ll have to reduce the baking time, though, checking after 15 minutes, and I bet this makes enough dough for two loaf pans. I am going to try it, too and comment after I do. I just made the dough.
I LOVE sourdough bread! I was salivating reading this! I can’t wait to try it!
New follower here via the Better Mom Mondays Link Up. Come by and follow back when you get a chance!
I love sour dough. I’ve always wanted to learn how to make it. I’m pinning this for sure. Thanks so much for linking up at One Creative Weekend! See you tomorrow!
Hi Heidi, I’ve never heard of the instant potatoes start, so I don’t know if it would work, but I’d give it a shot!
Hi! I am on day 7 with my starter. I think it smells more like straight alcohol than sour. Is it ruined or okay? I thought around day 3 or 4 it was a bit sour smelling. I just wish I knew what was a normal smell bc most days I’ve said it’s like alcohol. Anyway, I’m using unbleached organic whole wheat flour. My hubs eats gluten free, except he can eat organic sourdough without issue. I want it to work so much! Thank you for any help or advise.
Have you used it yet? I think it should work! Try it now.
This sounds so incredibly easy! I have to try this. I have one question, though–what kind of flour do you use? Maybe I was distracted when I read that part. Sorry if you already said it. Thank you so much for linking up with Making Space Mondays! I hope I see you again next week. -Tabitha
I literally just ate some store-bought sour dough. Yours looks so much better! Thank you for linking to Foodie Friday too!
What kind of flour are you using for this bread?
Hi Taylor, I used to use 1/2 white & half whole wheat, but now I use white whole wheat flour from Trader Joe’s. I have also used 100% spelt flour and 100% whole wheat flour, but I like the white whole wheat flour best since it’s less dense then the 100% whole wheat but still is all whole wheat. Hope that helps!
Hi! Do you use the white/wheat from Traders for the start now as well? When you place in the fridge and “feed” it, equal parts flour/water, how much, or how little will work? Thanks! I’m not a bread maker, is all new!!
Ok, ok, I read through tons of comments and got my feed question answered, but still wondering if half/half for starter works well. Thanks!
Hi Tracey. I absolutely think it would work, although I have never done it. I don’t see why it wouldn’t. I hope that helps, and let me know if you have any other questions!
Thank you for sharing this informative, helpful and interesting post with the Hearth and Soul hop. Your sourdough bread looks wonderfully delicious!
You are welcome. Thanks for visiting, April!
What an easy sourdough recipe! Thanks for sharing it at Hearth & Soul Hop. I have been wanting to try a simple recipe like this.
You’ll be amazed at how easy it really is. Just fix it and forget it for a while.
Place dough on a floured surface, and turn a few times. You don’t need to aggressively kneed it. The dough can also stay sticky in the middle. I use a spatula to mix it all in. This will help your hands to be cleaner.
How much flour do you work in at this point? The sponge was like a batter, so I had to work in a lot to make a dough. I just guessed at it based on my previous bread-baking experience. It’s in the oven now. I’m sure it will be edible, but I’m not sure if it will be light or dense.
May be it’s been around a cup. I am guestimating since I don’t measure. The first time I made this, I didn’t put 1/4 cup of the flour I was supposed to, and I added maybe 2 cups or more, and it turned out great! I’d love to know how it turns out!
It was awfully dense. I think I mixed in too much flour. I will try again, though. 🙂
Give it another go! Good. Thanks for the update!
Oh my deliciousness! Love it! Thank you so much for the directions and recipe. I’ve never made sourdough bread before (out of fear) and now I’m afraid I’m going to eat the whole loaf myself!
No problem! So glad you like!
It worked! This was so easy and tasty. Thank you so much!!!
So glad to hear!! Thanks for letting me know!
Hi,
I followed you over from Chic & Crafty Link Party. Sourdough is my FAVORITE and I can’t wait to try this out. Thanks for sharing.
I would love to invite you to share this, and any other posts you would like to, at my Creative Thursday Link Party at http://www.michellestastycreations.blogspot.com. (Runs through Monday each week)
Have a great day, Michelle
Do I stir before refrigerating?
Hi Amber. Yes, I stir before refrigerating.
Thank you so much for sharing this recipe. My mother use to make something like this when I was a child. I just had no recipe to follow. I can not wait to try your recipe.
So glad to hear! I’d love to know how it goes!
I can’t wait to try this. Found you by way of It’s a Keeper party. Keep saying I am going to try sourdough bread but haven’t yet.
Amber recipeswelove.net
Let me know how it goes! Thanks for stopping by!!
This is wonderful information! I’ve used a starter years ago and somehow lost the recipe and directions. I can’t wait to try this one. Thanks so much for sharing at Mix it up Monday 🙂
You are welcome. We are in love with the sourdough now!! Besides bread, I have been making rolls, cinnamon rolls, doughnuts & pancakes (with extra ingredients), and more. It’s so flexible!! This weekend I will try pizza dough and maybe some crackers!
Is there a recipe for the pancakes and other things that use more ingredients then just using the sourdough on your website? I would love to know the recipes!
Hi Lenora, No I don’t have any other sourdough recipes on the website, but I am going to put some on. Thanks for visiting and stay in tune! By the way, I play piano and my husband plays guitar!
Hi there! I have been trying for a couple of months to make good homemade bread. I had a nice starter, but the bread recipe I had kept turning out too sour and/or too dense. When I followed your recipe, I FINALLY got a bread that was not only edible, but delicious! Thank you so much!!!!! 🙂
You are welcome. That’s awesome! I am so glad to hear you had success!!
Thank your for sharing this. I failed with another sourdough starter recipe from the Peas and Thank You blog, but this one look simpler, and I didn’t know about boiling the water. I will definitely give this a go this week.
I hope this works for you! I do try to make things as simple as possible for me, since I find myself excited about so many different things.
Yum would be an indulgent breakfast! Would love you to link the post up at my new link party – Breakfast Ideas Mondays – http://www.yummyinspirations.net/2012/04/breakfast-ideas-mondays-1-new-link-up.html
I’ll have to come by. Thanks for stopping in!
I also can not wait to make this. Thank you for typing everything out!!!
I can’t wait to make this! I will let you know how it turns out!